


Stop by the Kids' World desk throughout June to pick up the supplies to make a magnetic woven bookmark. Or, use your own supplies from home and follow the directions below. Watch our how to video on YouTube to see step by step instructions.
Supplies:
- 4 strips of paper
- glue stick
- magnetic strips
- Scissors
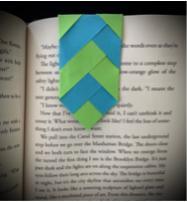
- Place one strip on a flat surface, then add glue to the end. Lay the end of another strip over the end of this strip so that the strips form a right angle (90-degree angle).
- Lay another strip so that it is perfectly aligned (parallel) with one of the first. Add a dot of glue on back and stick. Next, add another bit of glue on each strip where the first strips cross. Then, lay the end of a strip over the glue so that it is right next to the first strip. Repeat this for the other side. Make sure you have two parallel strips on one side of the right angle and two on the other side.
- Now it is time to weave! Fold and glue the outer strips over the inner strips one at a time. Take the glue stick and add a dot to the strip next to it. Then, fold the strip at a 45-degree angle so that it overlaps the strip next to it and press to secure.*Repeat this weaving process back and forth
- When you get to the end of your bookmark, secure the last pieces of paper with more glue and trim off the edges.
- Fold over the top part of the bookmark. Now add your magnets - peel backing off the magnetic strip and stick on one side of the folded bookmark, then line up the second magnetic strip on top of the first and peel off backing.